 if you wait till
Google Analytics 4 is a robust and effective tool for gathering valuable information about website and users. It's also one of the most popular tools for digital marketers, giving them access to a lot of data on the site's users.
In the previous blog, we discussed Google Analytics 4 and the additional features required for a smooth transition and implementation of GA4.
Table of Contents
- 1. What is Google Analytics 4?
- 2. How to Set Up Google Analytics 4
- What is gtag.js?
- Set up your Google tag
- Connect Google products to your tag
- Send data with event
- What is Google Tag manager?
- Components of Google Tag Manager
- Set up and install Tag Manager
- 3. Navigating the Google Analytics 4 Interface (coming soon)
- 4. Using Google Analytics 4 Reports (coming soon)
- 5. Advanced Features and Customization (coming soon)
- 6. Tips and Best Practices for Using Google Analytics 4 (coming soon)
Google Analytics 4 (GA4) is the next version of Google Analytics, with improved capabilities and a more user-centric approach. Setting up GA4 is a critical step for organizations hoping to acquire a deeper understanding of user behaviour.
Creating a Google Analytics 4 Property
Following are the steps to create your Google Analytics account correctly:
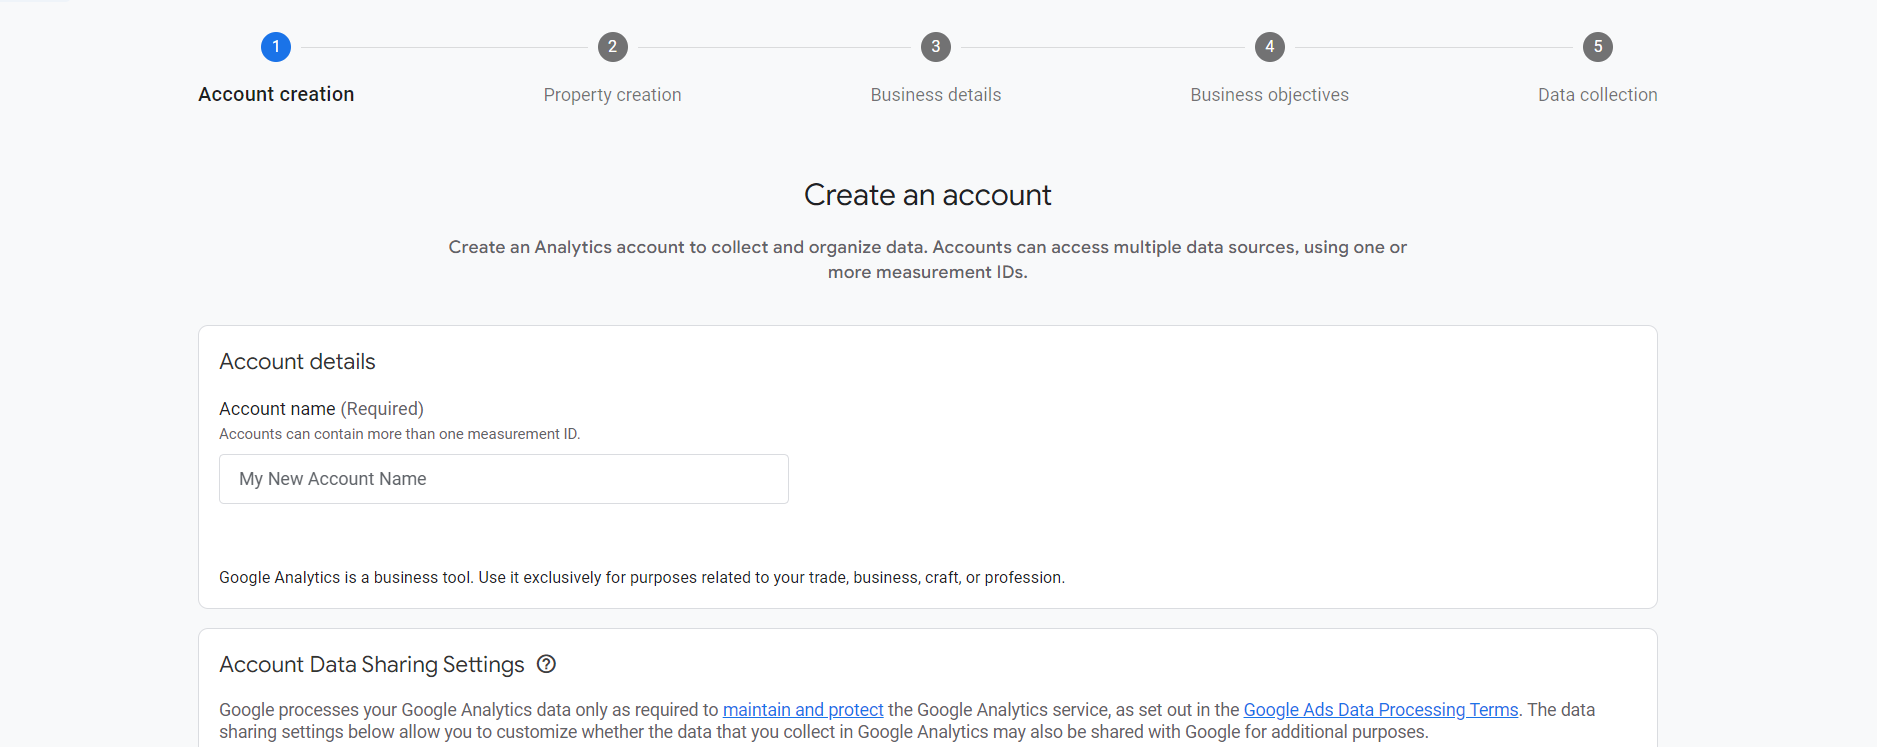
- 1. Visit analytics.google.com.
2. Click Start measuring.
3. Enter the account name.
4. Edit data sharing settings (optional).
5. Click Next.
6. Enter a property name
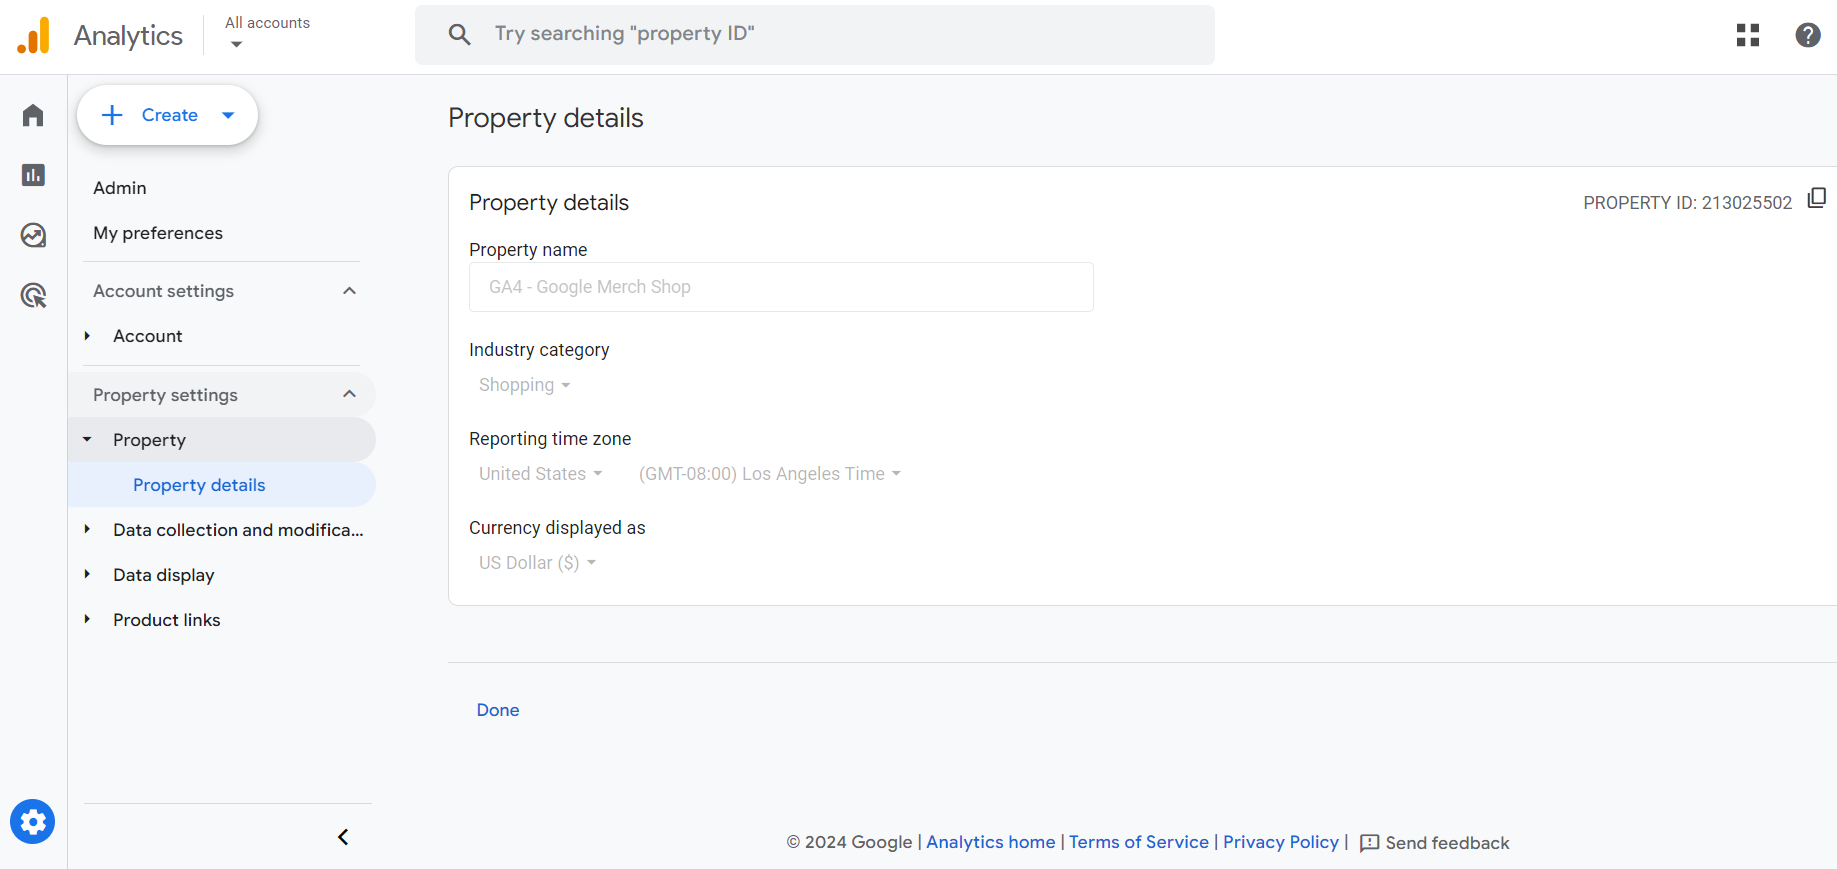
7. Verify the reporting time zone and currency (This should be accurate for the business’s location).
8. Select Show advanced options.
9. Toggle the option to ‘Create a University Analytics property’ on (This is considered best practice to keep GA4 enhanced measures enabled.)
10. Enter Website URL.
11. Click Next.
12. Enter industry and business size information (optional).
13. Click Create.
14. Accept the Google Analytics Terms of Service Agreement
15. Check web stream details
Start by logging into your Google Analytics account. Go to the admin section and add a new GA4 property. Follow the prompts, supplying important information such as the property name and reporting time zone.
What is Google tag (gtag.js)?
Google tag is a single tag used to track website and ad performance and deliver data to Google Ads and Google Analytics 4 destinations. gtag.js is a JavaScript framework used to add Google tags directly to web pages, requiring proficiency in HTML, CSS, and JavaScript. It is ideal for web developers who want to manage Google tags without setting up a tag management system.
Set up your Google tag
The Google tag (gtag.js) is a single tag that may be added to your website to enable a number of Google products and services (e.g., Google Ads, Google Analytics, Campaign Manager, Display & Video 360, Search Ads 360). Instead of handling several tags for different Google product accounts, one can apply the Google tag to the entire website and connect it to multiple destinations.
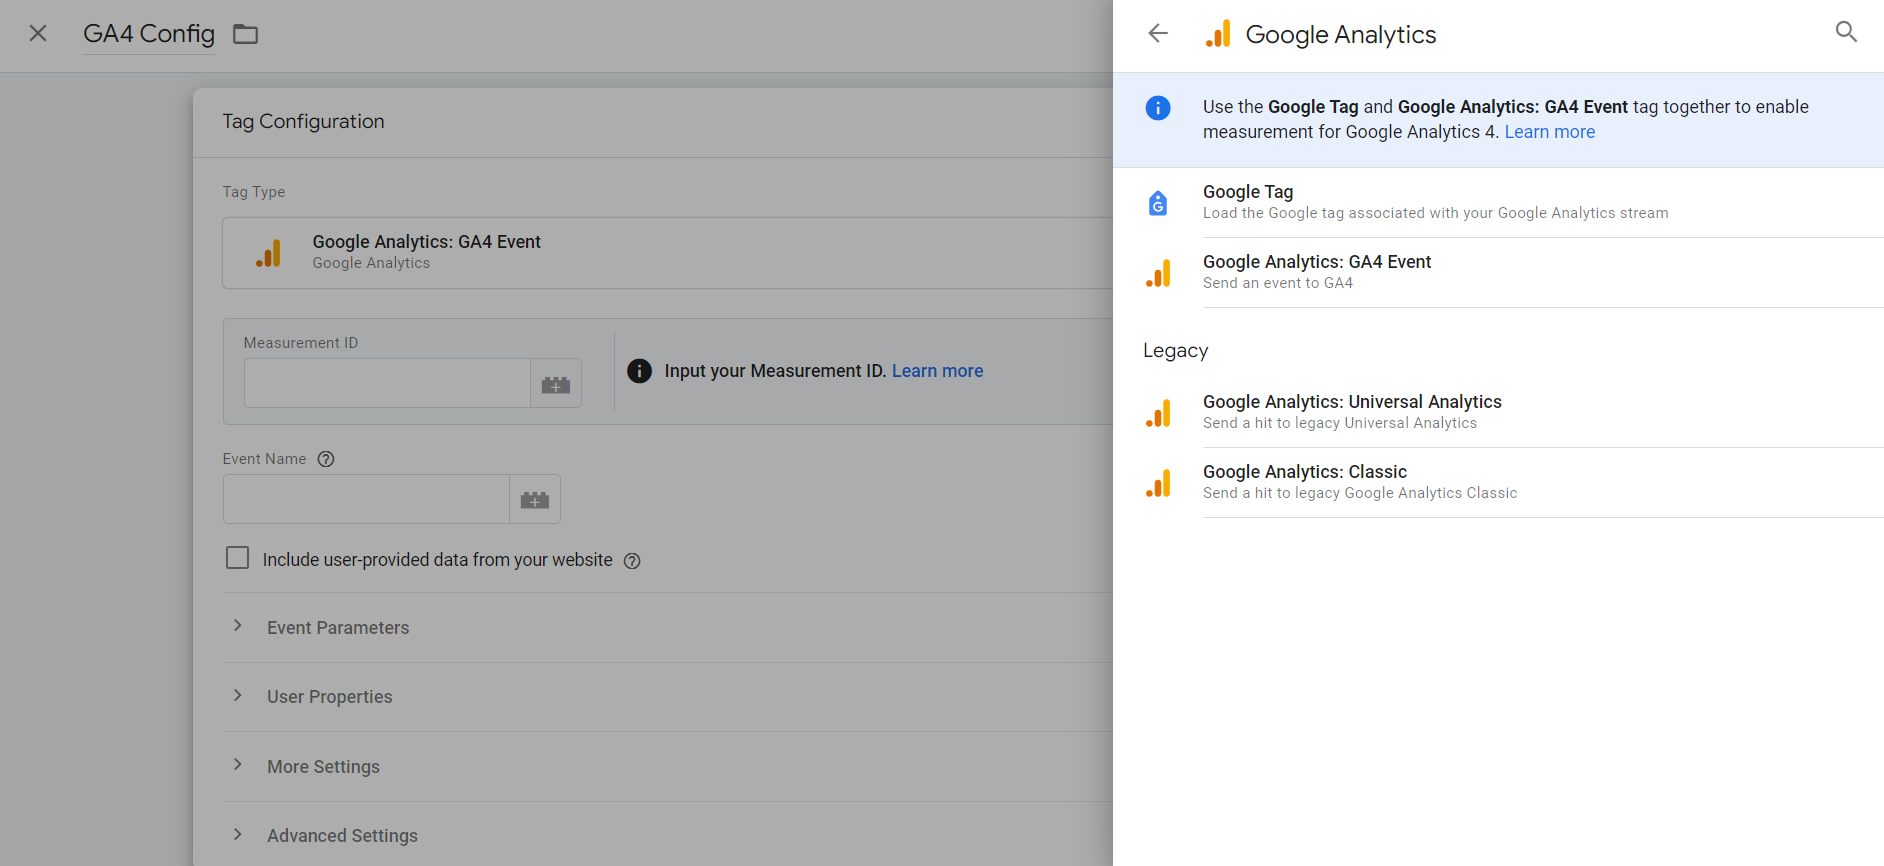
1. Access the Google tag screen by opening your preferred Google product.
2. Copy your Google Tag ID.
3. Insert your Google tag ID and snippet right after the "Head" HTML tag on each page to measure.
1. Open Tag Assistant
2. Enter the URL of the website to validate.
3. Verify that your Google tag ID appears in the header Google tags detected.
Now that you've created your Google tag, you may use gtag() commands anywhere in your code following the snippet.
2. Enter the tag ID of the Google product you want to integrate with the Google tag.
Connect Google products to your tag
The config command specifies Google products you wish to transmit event data to.
Send data with event
The event command lets you transmit event data to the products you specified with config.
After you've set up your Google products and events, you're finished with basic Google tag configuration.
What is Google Tag Manager?
With Google Tag Manager, a free tag management tool, one can manage and add snippets of code or marketing tags to their website (or mobile app) without changing the code.
Google Tag Manager allows data from one data source (your website) to be exchanged with another data source (Google Analytics). When you have a lot of tags to manage, Google Tag Manager comes in quite handy because all the code is kept in one location.
Components of Google Tag Manager
Google Tag Manager uses these concepts to handle how tags are configured and fired:
1. Tag: A tag is code that that provides data to systems like Google Analytics.
2. Trigger: A trigger listens for specific events like clicks, form submissions, or page loads. When an event that matches the trigger specification is recognized, any tags referencing that trigger will be fired.
3. Variable: A variable is a named placeholder for changing values, such as product names, prices, or dates.
4. Data layer: Tag manager implements a data layer to temporarily to store client-side values for use by tags, triggers, and variables.
Set up and install Tag Manager
Google Tag Manager is a tag management system (TMS) that allows you to quickly and easily update measurement codes and related code fragments collectively known as tags on your website or mobile app. Once the small segment of Tag Manager code has been added to your project, you can safely and easily deploy analytics and measurement tag configurations from a web-based user interface.
Your website or app will be able to communicate with the Tag Manager servers once Tag Manager is installed. Next, you can build variables that can be used to streamline and automate your tag setups, set up triggers that cause your tag to fire when specific events occur, and set up tags using Tag Manager's web-based user interface.
A container is a collection of tags, triggers, variables, and associated customizations installed on a certain website or mobile app. A Tag Manager container may replace all manually-coded tags on a website or app, including Google Ads, Google Analytics, Floodlight, and third-party tags.
Google Tag Manager allows you to configure and deploy tags from both Google and third-party sources.
Select your country, and then decide whether or not you wish to share data anonymously with Google and others. Click Continue to go to the Container setup.
When you create a new account, you will be guided through the process of setting up a new container.
1. In Tag Manager, go to the Accounts tab and select Create Account.
2. Enter an account name and select the country.
3. Enter a descriptive container name and choose the container type.
4. To build your container, click build and accept the Terms of Service.
1. In Tag Manager, select Workspace.
2. Locate your container ID, "GTM-XXXXXX", near the top of the window.
3. Click your container ID to open the Install Tag Manager window.
4. Paste the code snippets into your website following the instructions in the Install Tag Manager box.
1. Navigate to Workspace and click Tags.
2. To create a tag, click New.
3. Name and configure your tag:
o Tag Configuration: Select the tag type to manage. If no tag type matches, you can construct your own HTML or image tag.
o Triggering determines whether a page tag is fired or blocked.
4. Click Save and add more tags as needed.
1. Click the preview button. Google Tag Assistant opens a new tab.
2. Enter the website URL where you installed the Tag Manager container. If there are any issues, begin debugging with the Tag Assistant.
3. To update a tag, click on its name and change its settings.
4. After saving your changes, start the Preview mode again to confirm that the issue has been resolved.
Setting up Google Analytics 4 is an important step in improving your understanding of user interactions and digital strategy. By following these steps and exploring GA4's advanced capabilities, you'll gain a plethora of actionable insights to help your business grow. Stay curious, react to changes, and use GA4's possibilities for data-driven success.
Form Submitted Successfully
 about us
  awards
  people